by Tiffany Nix • 2 minute read • November 27, 2013
If you've ever decided that you'll just blog "when you have time," you know that the time never really seems to come. Then, before you know it, it's been a month or two since you last published any new content! And that's not good. In order for your content marketing to be effective, publishing new articles on a consistent basis is key.
The solution? Creating an editorial calendar. Having this simple calendar in place will revolutionize the way you look at blogging for your business—it instantly makes it a priority, plus it makes it more fun! (Mainly because you're not scrambling at the last minute to figure out what you're going to do.)
So here's a simple way to create an editorial calendar using one of my favorite tools—Basecamp.
In case you haven't heard of it, Basecamp is an online project management and collaboration tool for businesses. I've been using Basecamp for about four years now, and I must say, I'm a pretty big fan. (It's pretty much a project manager's dream come true.) While it has a vast array of tools that are handy for your business, we'll just focus on the calendar today.
Step #1: Get a Basecamp account (if you don't already have one).
Basecamp has a 30-day free trial, which means you can test it out right now! After the trial period, there's a flat rate of $99 per month.
Step #2: Add two new calendars.
We're going to start by adding two calendars—one for blog post publish dates and one for draft due dates.
Depending on your company size and approval processes for blog posts, you may want only one editorial calendar (with publish dates only), but I prefer having two. Having two separate calendars will allow you to toggle back and forth between draft due dates and publish dates when it's convenient for you to see one or the other.
To add the calendar, you'll go to the "Calendar" section. (You can't miss it. It's at the very top in the navigation.)

Then "Add a calendar."
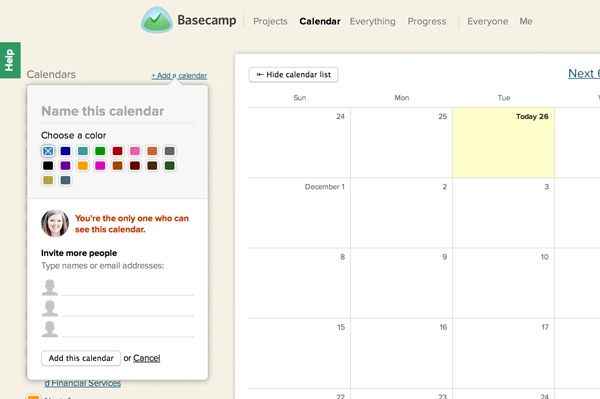
Name one "Draft Due Dates" and the other "Publish Dates." Make sure to choose a different color for each calendar for ease of viewing. (Blue and orange are always our choices at Nectafy.) Also, remember to invite your co-workers to join each calendar—especially those that are participating in your content marketing.
Step #3: Decide which dates you'd like to publish your content and start adding events to the "Publish Dates" calendar.
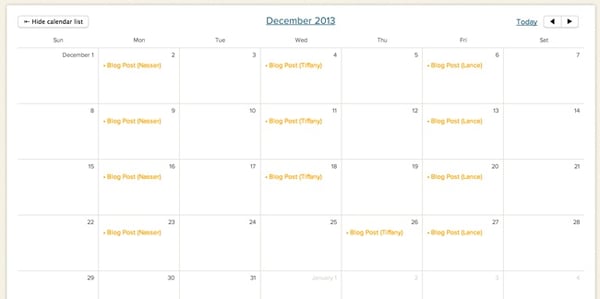
At Nectafy, our most recent goal is to publish articles on Monday, Wednesday, and Friday of each week. We have separate authors writing each post, so when I create our calendar, I always include the name of the author in the title of the event. This makes it really easy to see whose article will be going up on what day.
It's so easy to add an event to your calendar. You simply click on the appropriate day, and this pop-up box will appear.

Notice that there's a little checkbox that says, "Send other people an email now and a reminder at 7am the day of the event." I love these little reminders! So, I always check the appropriate author/poster to ensure they get notified about that day's post both now and on that day.
After you start adding your events, your "Publish Dates" calendar will start looking something like this.
Step #4: Decide how many days in advance blog posts need to be completed and approved by. Then add those dates to your "Draft Due Dates" calendar.
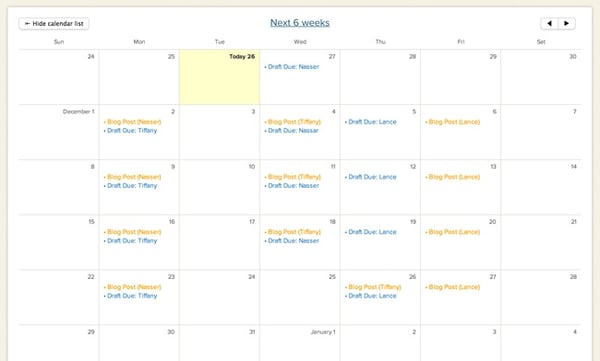
For many businesses, there's an approval process for posting, so articles must be written in advance. The two-calendar model not only allows you to have a clear snapshot of publish dates, but also gives you an extra "task list" of draft due dates. At Nectafy, we have longer turnaround times for approval based on the author and the situation, so here's what our "Draft Due Dates" calendar looks like.
Remember those reminders that send at 7 a.m. on the day of the event? That's where these really come in handy. Because, if you check the appropriate people, the author of your post will get an email the morning of the day that their blog post draft is due (reminding them to write it!).
Step #5: Brainstorm a list of topics to blog about. Then go back through your "Publish Dates" calendar and add your topics in.
To get a clear picture of your overall content marketing schedule, you can go back in and add blog post topics to each day. In my opinion, it's much easier to settle on topics in advance! That way, you don't have to do the work of choosing your topic the same day you decide to write it.

Step #6: Keep this calendar in front of you.
In order for this calendar to work, you have to keep it in front of you on a daily basis. At minimum, use the reminder email feature. You can connect it to another calendar that you do use often (see Step #7). Or set it as a page that automatically opens up when you open your browser. If you do begin using Basecamp for all of your project management, you'll just automatically check the calendar like clockwork.
Step #7: Enjoy your color-coded, organized, drag-and-drop-if-you-need-to-change-it editorial calendar!
There you have it. Your content marketing now has the boost it needs to pick up some speed! Here are some great features of your new calendar:
- It's color-coded. Having the draft and publish dates in different colors makes it extremely simple to differentiate the two at a glance.
- You can view just one calendar or both at the same time. Sometimes you may only want to see draft due dates. Other times you might just want to see your publish dates. Or, it may be most convenient at certain points to see both. You have all those options! Just use the check boxes to toggle on the left side of the Basecamp calendar page.
- That "reminder email" option. I know I've already mentioned this twice. (Can you tell I love this feature?) But, really... those reminders are lifesavers.
- You can sync these calendars with an existing calendar tool. Have another calendar that you use through email or on your smart phone? No worries. Just click the "Subscribe to iCal" link at the bottom of the left-hand sidebar on the Calendar page, and you're instantly connected.
- Making changes to the calendar is a cinch. If you need to make a change or switch this around, you can simply drag and drop a calendar event that you've created to a new location.
Have a different way of doing things? Tell me about your blogging system! Leave a comment below.